

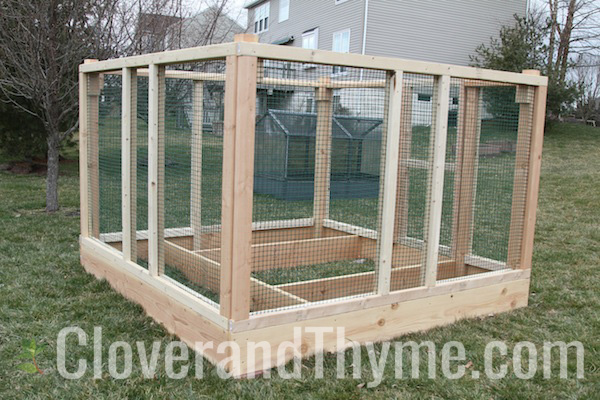
When last I posted on the new garden enclosure, it was still just a base, sitting in our garage. Well, I’m happy to report that the garden enclosure construction is now complete, and so far I’ve planted some onions, peas and mesculin lettuce blend in their new home.
I was kind of in a quandary over how to best describe the building process, since it was my sweet husband that did all the planning and work on this project. Soooo…I asked him to do more work and write up a guest post on the topic! What a guy I’ve got! Take it away…Bob!

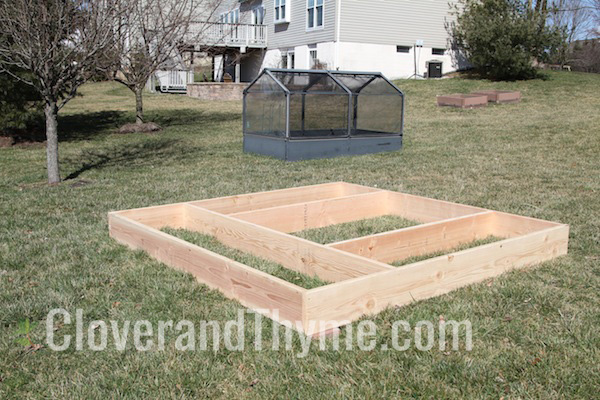
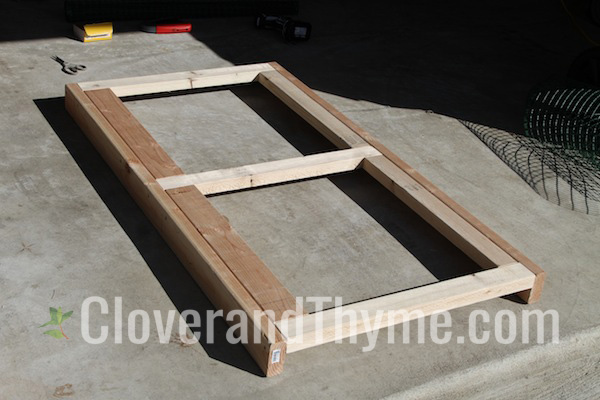
To create the most square perimeter, the outer portion of the garden planter was built in the garage. It is utilizing four (4) 8’x2”x10” boards. The corners are screwed utilizing deck 3” deck screws. The base was then moved to its planned location. This is one of the most flat portions of our yard, but far from perfect. Fortunately, I was able to just add a concrete brick at one of the corners, which allowed the base to be level in one direction and have the same slope in the other direction (not level). I would have preferred the whole base to be perfectly level, but this would have required much more site work, which for this structure was really not necessary.

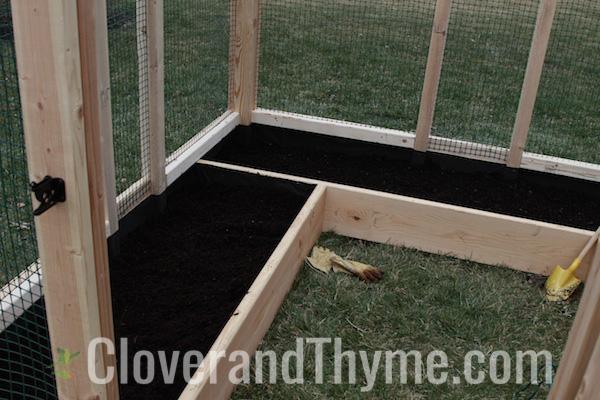
Now that the outer base is set, the inner beds need to be created. This was accomplished by utilizing the same 8’x10” boards to create 2’ beds. One (1) of the 8’x10” boards runs parallel to the rear 8’ outer board creating a 2’x8’ bed. The other two (2) 8’x10” boards are cut to length to create the other two (2) 2’ beds and are approximately 6’ in length. All connections are secured utilizing the 3” deck screws.
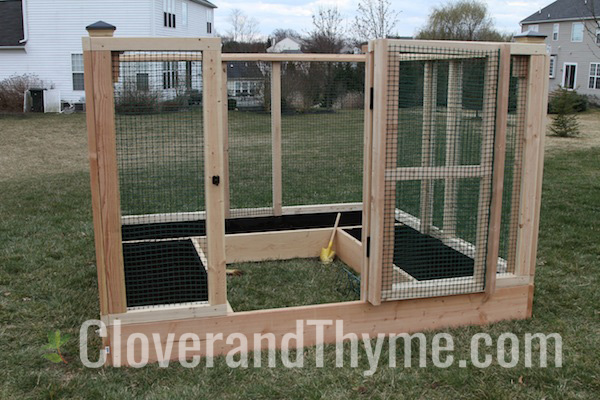
The next step is to mount the four (4) corner posts. Prior to mounting the 4”x4” post, we had to determine how high we wanted the beds to be protected from deer. After much contemplation, we decided that the protective netting would be at a height of 64”. The posts were cut to approximately 67”. The reason that the corner posts are cut slightly longer is to purely for aesthetics. We plan on putting some form of cap on the corners. The posts were then screwed into the outer corners utilizing the 3” deck screws. I only used a single screw so that later while squaring the posts, they were not totally locked into position.
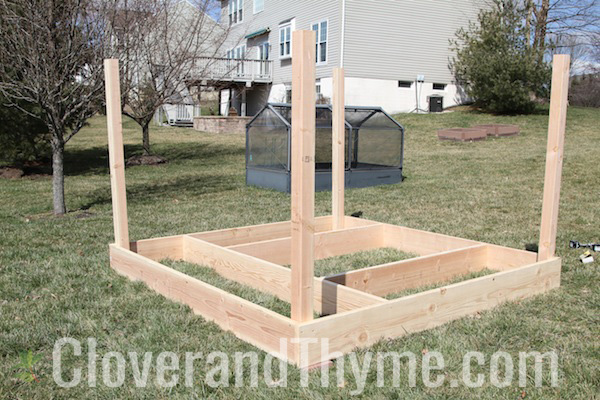
At the front of the garden beds, there will be a door. Utilizing two (2) 2”x4”s, additional pillars were mounted. One (1) at an approximate distance of 24” from the left front corner and one (1) approximately distance of 42” from the right front corner. This creates an opening of approximately 30.5”. It was very important that these two (2) pillars be level and plumb or the door will not open and close correctly and will not look right.
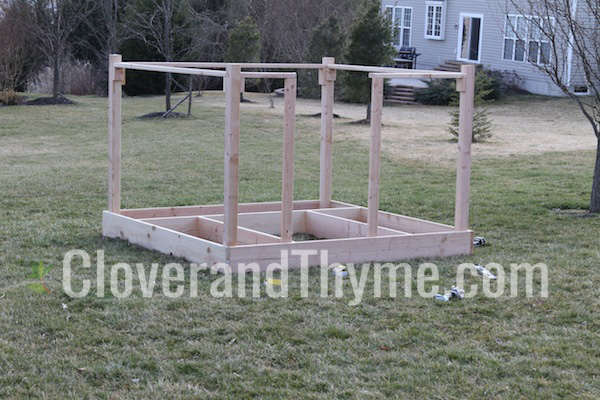
It was now time to connect all the post and pillars. Utilizing 2”x3”s, I created the top most portion of the garden planter with 2.5” deck screws. This step is important because it will help pull all the corner posts into square. For the length of the upper beam, measure the inner portion of the 4”x4” post at the top of the 2’x10” base. This may require someone (our children helped me) to help push and pull the post as you screw the upper beam in. This same process should be used at the front where the door will be installed.

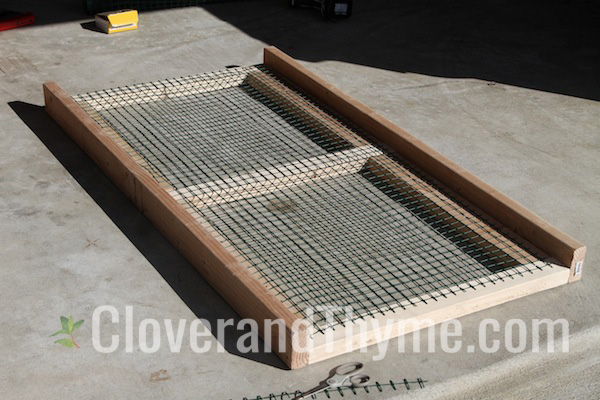
This next step will vary based on the material used to create a barrier to wildlife like deer. We decided to use a plastic mesh as the covering. The width and length of the plastic mesh dictated the support structure necessary to mount the covering. For our purposes, I added two (2) 2”x3” vertical support beams toward the middle portion of the two (2) sides and rear with 2.5” deck screws. This will allow the plastic mesh to be rolled from the top to bottom to be stapled and then decoratively capped with 2”x4”s at the corner and 2”x3”s at the top, bottom and two (2) middle supports.
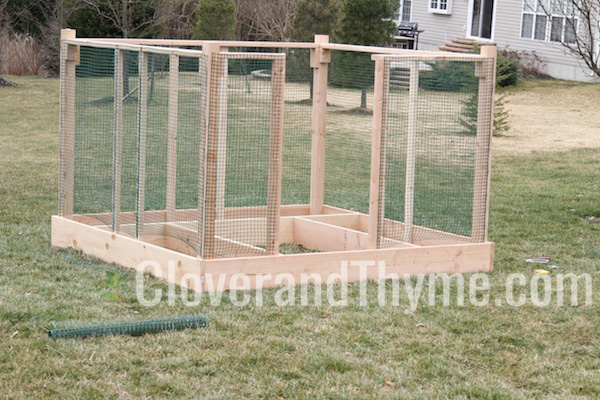
With the plastic mesh attached, it was time to add the decorative caps at the outer edges. To save cost on materials, I purchased 10’ 2”x4”s (which could be cut in half) to cover the corner posts over the mesh utilizing the 2.5” deck screws. I would have done the same with some of the 2”x3”s, but I was only able to find 8’ lengths of the material. As you can now see in the photo below, adding the 2”x4”s and 2”x3”s creates a nice finished look to the structure.
The door is sized to fit the created opening. The outer part of the frame are 2”x4”s with three (3) 2”x3”s between the 2”x4”s, one at the top, one at the middle and one at the bottom. Each is connected utilizing the 3” deck screws. Once framed, I utilized a 2”x4” on the left side to add additional support for the hinges that will be mounted. On the right side of the door, I utilized 2”x3”s for less weight but still adding extra frame support. The mesh is stapled to the rear of the front façade.

Tools utilized:
Drill
Driver
Hand Staple Gun
Compound Miter Saw
Speed Square
Level
Utility knife

For some updates on what I planted in this enclosure as the season progressed, visit:
June Garden Greenery
July Garden Gallery
I turn my back for one second…

Amazing!! I always thought I would like to have a garden when I retire. I’m sure there is very good soil in heaven!
Love the enclosure! We are about to attempt something similar, so the step-by-step is really helpful.
I’m glad it was a help, Lauren! If you do build something similar, post a picture! I’d love to see it!
HI Becky, Approximately how much was the cost in materials? Thanks!
It’s absolutely gorgeous! What are you using for soil, it is so dark and rich looking?
Hi Lisa! We used bags of organic garden soil. The beds are open, so underneath the bagged soil is our yard soil.
With so many deer around all the time, I could use one of these for my “special” things, although I would have to put a roof on it too:)
You know, if you cover the top and sides with a thick clear plastic, you can convert this into a greenhouse in the fall and early spring. But, it looks great. Do you have many deer?
We have many deer. Keeping them out of our yard has been an ongoing challenge. Your greenhouse idea is a great one!
Do you have a list of wood used for this project. It looks great and I would love to try it
This is a fabulous idea, and will keep out these critters that love to nibble on the veggies.
I made something similar last year to keep the insects away from my kale and collards. Not nearly so attractive as yours, as I make it from pallets and discarded window screens. We’ll see how it works out this year. I decided I was tired of looking out the window at the pallets, so I’m painting them now. I’m toying with the idea of adding a little architectural detailing to make it a little more interesting to look at, but I don’t know what. Yours is nicely designed.
Thanks! Yours sounds great, too! I’ll bet the pallets look great painted.
I’ve repurposed my old windowns, and am doing something very similiar to yours. I have to have a roof, I made a smaller enclosed garden last year, just as the tomatoes were about ripe enough to pluck, something, either a squirrel or chipmunk got in and devoured all the tomatoes in 1 day, including all the leaves. Good luck w/ yours.
I’m so sorry you lost your tomatoes. 😦 Mercifully, we don’t get many squirrels around our yard.
If you want strawberries, you might consider this vertical planter:
http://www.backyard-gardening-fun.com/strawberry-tower.html
Oooh! That looks fantastic! I could put that to good use for sure. Thanks for the link!
I love this concept, but I would either need to make 10 of them or build it much larger than seen. I do admire the designer
Hi, Linda! Yes, this is more fitting for a small garden. Thanks for visiting!
The dimensions are 8’x8′ and 5’7″ high. Correct?
“The [4″ x 4″] posts were then screwed into the outer [2″ x 4″] corners utilizing the 3” deck screws.” I know 4x lumber is not really fully 4″ x 4″ and 2″ x 4″ is not fully 2″ x 4″, but it seems a 4x against a 2x would still be more than 3″.
Absolutely STUNNING! The only thing I would possibly add is hardware mesh underneath for those who have problems with burrowing critters. GREAT JOB!
It looks great , but in my opinion, you probably should have used pressure treated wood for any part that touches the ground. The moisture and sub-terranean termites will likely greatly reduce the life of the structure. Great project! Good luck!
Plastic mesh is nce to work with but I used plastic chicken wire to keep rabbits out of my garden and learned that they will chew a hole threw the plastic mesh. Suggest using metal wire.
i like it, i also was wondering what/where did you get the green house in the background?
Hi Kevin, thanks for the comment. The enclosure in the background is a GrowCamp, we got ours at Costco.
Do you happen to have a mere rials list for this? I love it!!
Excellent design and pretty good explanation. Perhaps update the post under the tools needed section and give a full list of the lumber needed? I think I pulled all of the necessary info off of here and onto my shopping list, but also feel i will end up being short somewhere.
Thanks!
Could you possibly post a material list? This will be my first time making anything like this…well anything at all really, and I dont want to miss anything. Ps. I love the step by step instructions, and I love the idea. Thank you!
Reblogged this on Watch My Garden Growing and commented:
Looks like a mini garden, cute and sensible for a small area.
Do you have a materials list for this? It looks amazing.
Hi Melisa, Hubby has never really written up a formal materials list beyond what he wrote here, but I will pass this request along as you are not the first to ask! Thanks for the visit!
hi how can I get the plans to build this?
Wondering the same?!?
Great looking job,just thinking maybe it could be easier if you put the dirt in before you put on the netting..Just a thought..geg
Thank you so much for this! My husband used your post to build my garden box. The only real difference is mine is enclosed on top. We have problems with squirrels!
Naomi, Thanks for commenting! I’d love to see photos of your structure! I will contact you with my email in case you would like to send some photos my way. Happy Gardening!
Can you provide me with a list of the building material needed to make this raised garden?
I am thinking of using this design for a classroom garden. What was the overall cost for materials?
After seeing this, I may give gardening another go. Had a beautiful garden the years my 17-lb tom cat, Zeke, was alive. He kept the critters out of our yard. My little beagle-weiner dog mix tries to do squirrel patrol, but she can’t sneak up on anything for her barking. If I add a roof, this looks like something that would keep the squirrels from eating the vegs and destroying the plants they don’t like, and simple enough I could do it myself. Thank you 🙂
Any chance of getting a materials list for this? It is a wonderful garden bed and I am interested in making one.
I love this idea. I’m going to give it a go. I will probably buy a little bit of my own twist to it as well. It definitely gave me an idea. I’m trying to add and gather up how much wood he actually purchased and etc. if you can update it, it’ll be nice to have that information although I know that’s a bit much. Do you know exactly the cost of everything together? I love this idea especially since I have a pet goat. Good fertilizer but she’ll definitely eat all of my fruits and veggies. Sometime this beautiful month of April I hope to have it all together. Thank you so much for sharing.
this is amazing. being that we can’t get out right now (and possibly for mother’s day), I think i’m going to spend some time figuring out how to do this! this will either be an awesome mother’s day, or an “it’s the thought that counts” mother’s day.
I hope it’s an awesome mother’s day!!
If you are looking for beautiful backyard vegetable garden installation, check out this .
vertical flower garden
Thank you for sharing these instructions on how you built your garden enclosure! My husband and I used your design to build our garden this year, and it has turned out beautifully! The photo step-by-step instructions helped us so much.
That’s wonderful! I’m so glad to hear that my post was a help! If you happen to have photos or a blog post about your garden, I’d love to feature it!
Hi Becky,
I’d be happy to share a photo! I would have shared one here in the comments but I don’t see a way to attach a photo. I’d be happy to email you photos of our finished garden!
I’d be happy to share photos! I don’t see a way to share photos in these comments, but I’d be happy to email you some!
I love it! What is the finished size of your garden?
Becky this is inspirational. So inspirational, I decided to tackle my garden enclosure myself, instead of hiring a contractor. I plan on knocking this out early next year. It would be great if we could see a picture of Samantha Coccia-Schillo’s enclosure, that she sent you. It will help keep me motivated. Thank you for sharing.
I love the design I am attempting to make one now!
What size lengths were the 2×3 and 2×4 to begin with?